Party Time!

Primarily I design and decorate homes, and occasionally refinish or repurpose furniture.  But this week I branched out into somewhat new design territory.  I guess I’m sorta known among my friends for being the “creative” one (a compliment and certainly not the worst thing they could call me).  One friend decided to throw her daughter a huge sweet 16 birthday party and enlisted the help of her friends to do everything from catering to sweets to decorating … that’s where I came in. (Friend Colette provided catering and dessert with her company ColMoni’s Catering and it. was. fantastic!)

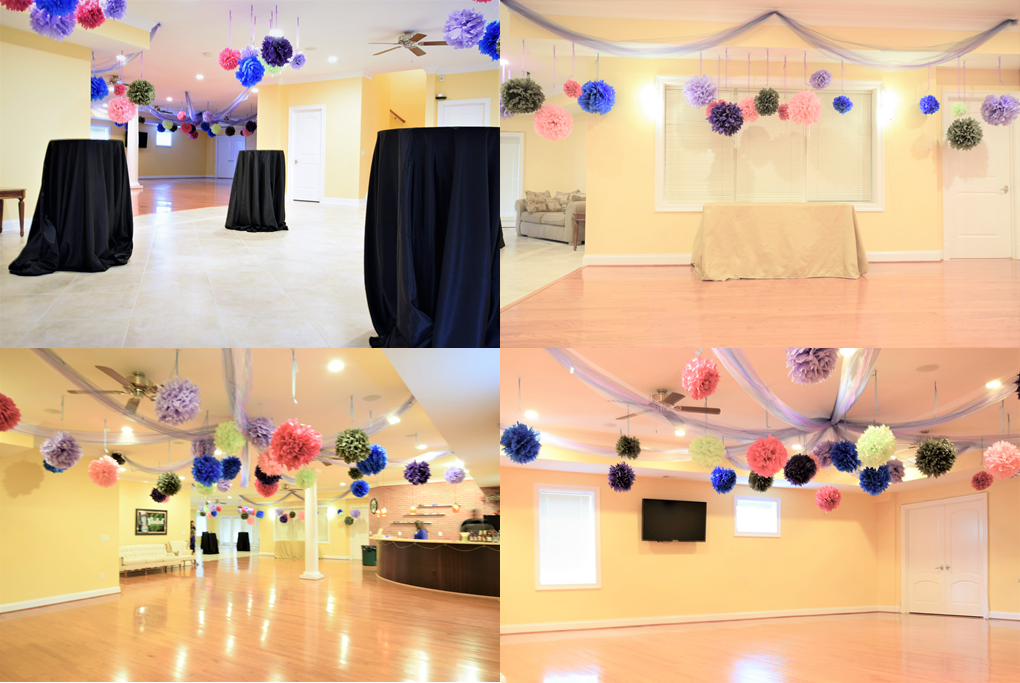
The party would be held in my friend’s very spacious home and host over 100 friends and family.   Much like designing any other room, we began with an inspiration piece to base the rest of the design on.  Our inspiration began with the gorgeous invitations which featured a watercolor floral motif with periwinkle as the feature color and splashes of other shades, deep and light pink, light and dark green and a range of blues and purples.   We decided to decorate the expansive basement dance floor with streamers of tulle and tissue paper pom-poms in this same range of hues.  Here are some of the material basics that we utilized.

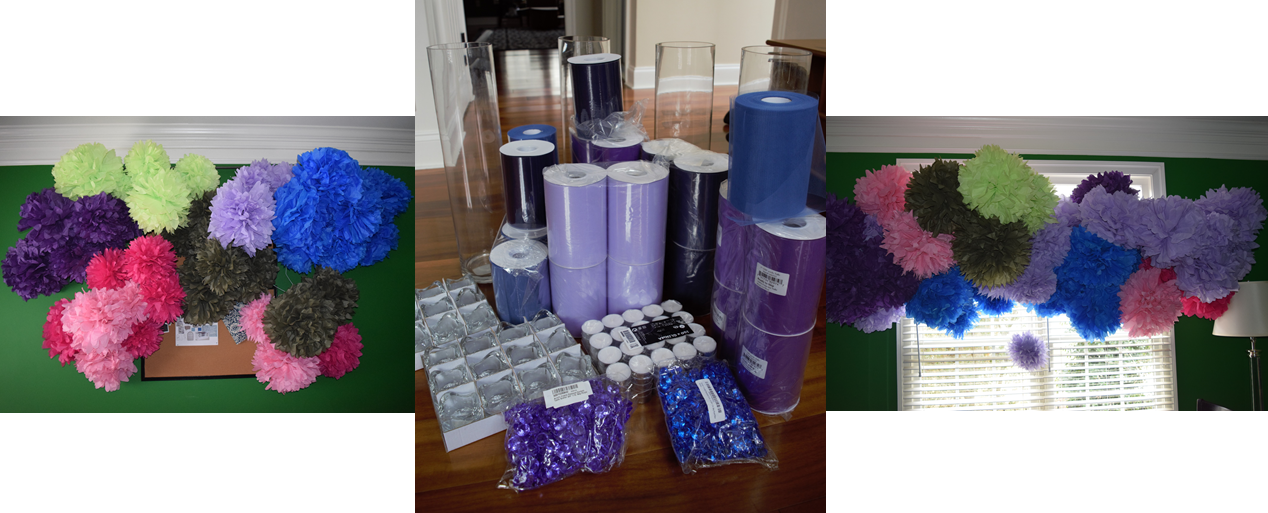
There are about a million tutorials out there for making tissue paper pom-poms and it really isn’t that hard but it IS time consuming.  We made over 125 tissue paper pom-poms of varying size and color.  To say it took a long time is an understatement, but the end results were all worth it.  We put pom-poms on the dance floor, we put them over the cake table, over tall drink tables, on the cake table, at the home entrance, and hanging from the balcony.  All of those same areas were also adorned with varying shaded swags of blue and purple tulle ribbon and fairy lights.  I think the overall effect was exactly what  we were going for, transforming a stately and elegant home into a fun and whimsical setting for a Sweet 16!  Here’s a few preparty shots in daylight.


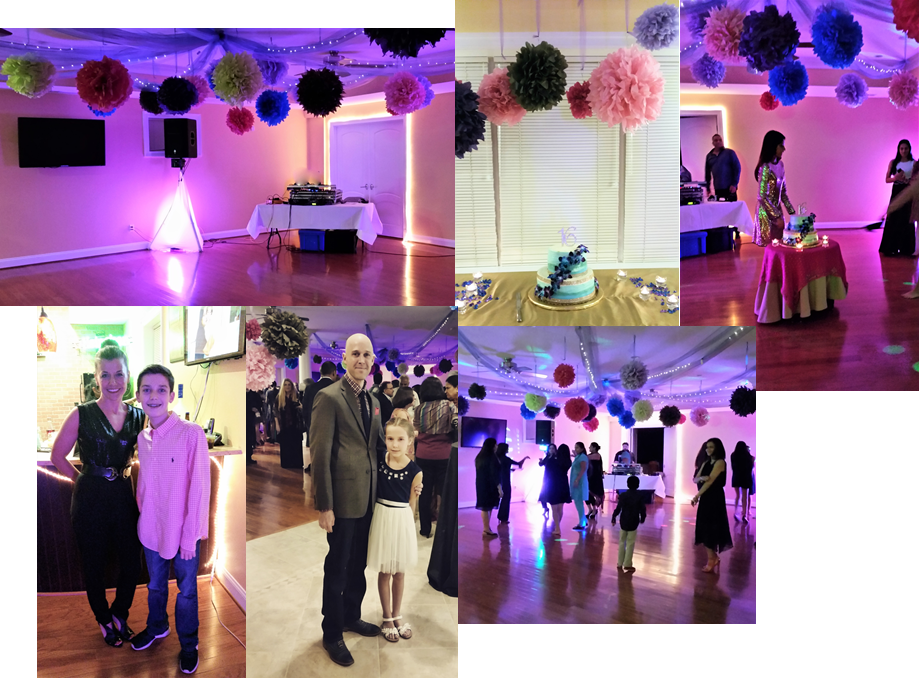
These are a few evening pics during the party (please forgive poor cell phone quality).


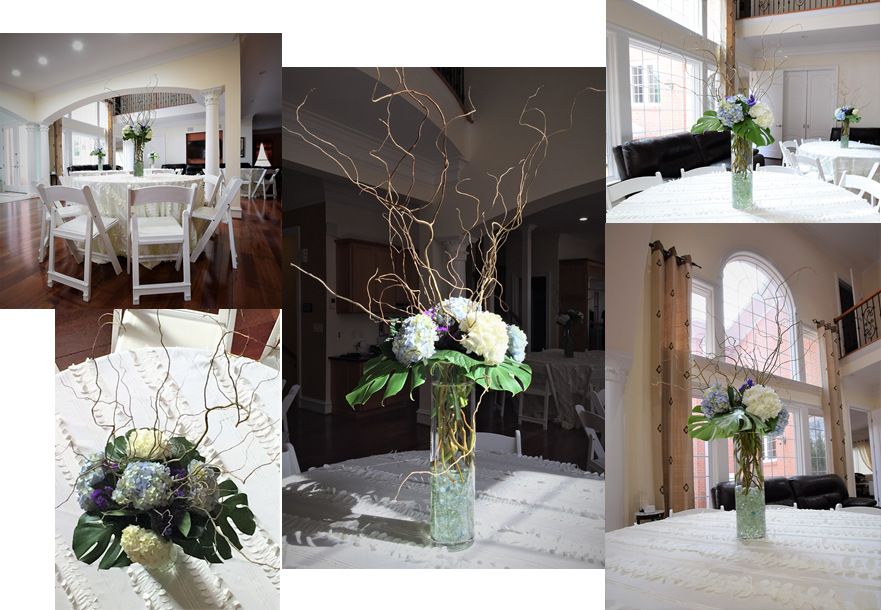
As you may have noticed I have a love affair with flowers so I was very excited to also design and arrange four statement centerpieces.  We selected a tall vase filled with hydrangeas, curly willow, monstera leaves and purple statice accent.


While decorating parties isn’t the core of my business, I think I’d love to take on a few more and really perfect this design art!


Highbrow, Low Budget: Holiday Edition

Keeping up with the latest holiday design trends can be expensive, especially if you like a fresh look every few years.  Here we show you two very similar options for upgrading your holiday decor, with some staple items like a good tree and wreath as well as a few decorative accents.  The highbrow version can be yours for the yowza price of $3,525 while the low budget version can deck your halls for just $942!  And the looks are strikingly similar and both on trend for this holiday.

Highbrow

The highbrow version features a Frontgate faux tree with lights, and truth be told they DO make a really nice faux tree, but in reality you could buy a REAL tree of the same size for 30 years before you reach the cost of this tree.   This wreath is gorgeous with apples and varied greenery and rusty jingle bells and adds to the traditional yet natural vibe of this collection.  The most ridiculous item on this list is the large 29″ nutcracker from Crate and Barrel.  It’s price was originally $1200 but if you like a sale and still want to throw away money at the same time you can have it for $940- yikes!  Faux fur, plaid, and velvet keep you totally on trend for this holiday in the pillow, stocking and tree skirt.  Finally, I think this candleholder may be real antlers, ew,  but it is quite a statement piece, and at $575 it had better be!

high-brow-holiday


Frontgate Fraser Artificial Pre-lit Christmas Tree 9ft  $1500

Charlestown Decorated Wreath    $200

Natural King Nutcracker   $960 (yikes…that’s the clearance price!)

Tartan Wool Pillow Cover with Fringe, Red  $100

Cuddle Up’ Faux Fur Christmas Stocking   $40

Quilted Velvet Tree Skirt, Chili Pepper $150

Antler Candle Centerpiece  $575

Low Budget

Certainly, there are a few high end tree brands, but in reality, once you get it decorated with all your ornaments, will it really look all that different from one that you spent a fraction of the price on?  This tree, from Home Depot, is also a very full, 9 ft Fraser Fir, still isn’t “cheap”, but looks realistic and is almost a third of the cost of the highbrow version.  This low budget wreath adorned with faux apples and pine cones  has a beautiful natural look.  The over 2 ft tall nutcracker is much more affordable than the highbrow version and looks just as great.  I think I may even pick up this plaid pillow with excellent frayed edge detail, it’ll be a great sofa accent all winter long.  The big shocker of this group is the antler candleholder, which is totally fake, (whew, I feel so much better about that), and is $553 cheaper than the dead deer version!  Truthfully, it IS smaller, but at that price you could buy three of them to create the same scale and still not even be close to the highbrow price.


low-budget-holiday


9 ft. Feel-Real Jersey Fraser Fir Artificial Christmas Tree with 1500 Clear Lights    $600

Winter Berry Scented Wreath  $90

Father Christmas Santa Claus 3′ Nutcracker   $144

Hamilton Plaid Pillow Cover  $36

Grey and White Faux Fur Stocking  $20

Quilted Velvet Christmas Tree Skirt in Burgundy  $30

Gold Antler Taper Candle Holder Centerpiece  $22

What will you do with all of these holiday savings?  Maybe make a donation or buy a gift for a child in need this season.  Happy Holidays!


Window Wreath How-To

In keeping with my love of classic colonial design, I have for years admired the timeless look of putting a wreath hung by ribbon in each window.  I also am a fan of a candle in each window during the holidays and have been sporting this look for some time now.  This was the year I decided to make the investment in wreaths for each of my 8 front windows, and it was neither as difficult nor as expensive as I thought it would have been.  Here’s how it’s done.  First, a before shot of my house, boring!

windows-before


You’ll need:

  • One evergreen or faux evergreen wreath for each window (most people only do the front of their home). I used 24” diameter wreaths for my windows.
  • Wired ribbon, I used 4 spools that were 10 yards each and at least 2.5” wide
  • Floral wire
  • Hot glue gun and glue
  • Scissors
  • Wire cutters
  • Stapler and staples

The first thing I did (and I bribed my kids to help which made it go SOOO much faster) was remove the screens from my windows and cleaned the glass.  This will allow you to hang the wreaths from the inside and will overall look very neat and clean.

Next, before you hang the wreaths you probably want to put a bow on them.  A bow can either be placed at the top or the bottom of the wreath.  I opted to put my bows at the top.  Making the bow is the most time consuming part of the whole process and I’ll be honest, it can take some practice to get them right.

Cut a length of wire about 5 inches long and place it nearby.  Take a length of ribbon of about 18 inches but don’t cut it off the spool, but pinch it at the 18” mark.  This will leave one of the 2 “tails” of the bow.  Take about 3 to 4 inches (depending on how large you want your bow to be and how big your ribbon is) make a loop and repinch it.

1st-loop-2


There’s going to be a lot of pinching going on for the next few minutes – warning – your fingers will probably cramp up.  Turn the ribbon about a quarter turn and make and pinch another loop.

3rd-loop


Repeat this process several times until you have 5 or 6 loops, just until it looks right.  Brilliantly descriptive, eh?  Take your pre-cut length of wire and wrap it around the area where you are pinching and twist it very tight so that the loops stay intact and are held together.

wire-box


Pull the ribbon another 18” from the spool and cut it free from the spool.  Angle cut the end of each tail.  Ta-da! You made a bow.  Once you get the hang of this technique it is such a great skill to have in your repertoire for gift wrapping, floral arranging, it really comes in handy!

Next, it’s on to attaching the ribbon that will actually hang the wreath.  Pull several feet of ribbon from the spool (will depend on the size of your window and the size of the wreath).  I like to hang mine about halfway down the window so about 3.5 feet of ribbon was enough for me.  Again, leave this length of ribbon attached to the spool and wrap it around the “top” of the wreath leaving an overlap of about 4 to 6 inches in the back.  Staple the ribbon where it overlaps.

hanging-ribbon-staple


I also like to add a few dots of hot glue between the 2 lengths of ribbon to really hold it.

hanging-ribbon-glue


Next attach your premade bow.  You could hot glue it on, but over time, especially if you live in a warm climate, this could come free, so I prefer to wire mine on.

ribbon-attach-to-wreath3


Take a length of about 5 inches and wire the bow to the wreath.  Since I put my bow at the top of the wreath I wired mine around both the wreath and the top ribbon for extra security.

ribbon-attach-to-wreath


Now it’s time to hang your wreath!  You could measure out exactly how long you want to hang them but I used the grids on my window and just eyeballed it.  Open the top of your window and dangle the wreath out, holding onto the spool end of the ribbon.  Lower the wreath to the place you want it and close the top window.  Cut your ribbon from the spool with about 5 inches to spare.  Use this excess to tie a knot (depending on how substantial your ribbon is you may want to do this several times over so your wreath stays secure in the window).  If you have wood windows you could also thumbtack them to the frame, but the knot method works for vinyl or wood windows.

knot-in-ribbon


Cut off any excess ribbon hanging inside the window.

close-knot-in-window


Repeat for all of your windows, and once complete be sure to take a trip outside to make sure they all look even and if necessary just pop inside and reknot if a wreath needs to go up or down!

wreath-at-halfway


I got both the wreaths and ribbon on sale and spent under $40 for the project.  Besides cleaning the windows it took me about 2 hours to complete and hang all 8 wreaths, though I did have this little helper.

wreaths-lil-helper


Window wreaths: Follow this simple tutorial to add classic holiday charm to your home exterior with window wreaths!


Get to decking those halls!